← All Tutorials
Iperius Remote Management Console: How to customize Iperius Remote with your brand
Iperius Remote is the only remote support software that allows true “full rebranding“, meaning it can be completely renamed with your company’s name and icon.
Customizing Iperius Remote involves not just inserting your company’s details into the software but allows changing the software’s name and its main icon. This is very important for your corporate image, especially when remote support becomes a key service of your business.
Furthermore, Iperius Remote allows you to pre-set several important options within the customized version to automate and manage remote desktop sessions more effectively.
It is worth mentioning that the ability to generate customized executables of Iperius Remote starts from the Pro version. If you wish to use it with lower versions, you can purchase this option separately for a one-time fee of €150.
Here are the few simple steps required to generate and download a customized executable of Iperius Remote:
Once you have purchased a Pro version or the customization license for lower versions, access the Administrative Area of Iperius Remote and go to “Custom Client”:

Depending on the license you hold, you can maintain 1 custom version (for Small or Medium licenses) or 2 custom versions (for Pro licenses).
If we have previously generated a customized executable, we will already find the links to download it. Of course, it is possible to edit the custom version at any time.
Add a new customized version of Iperius Remote.
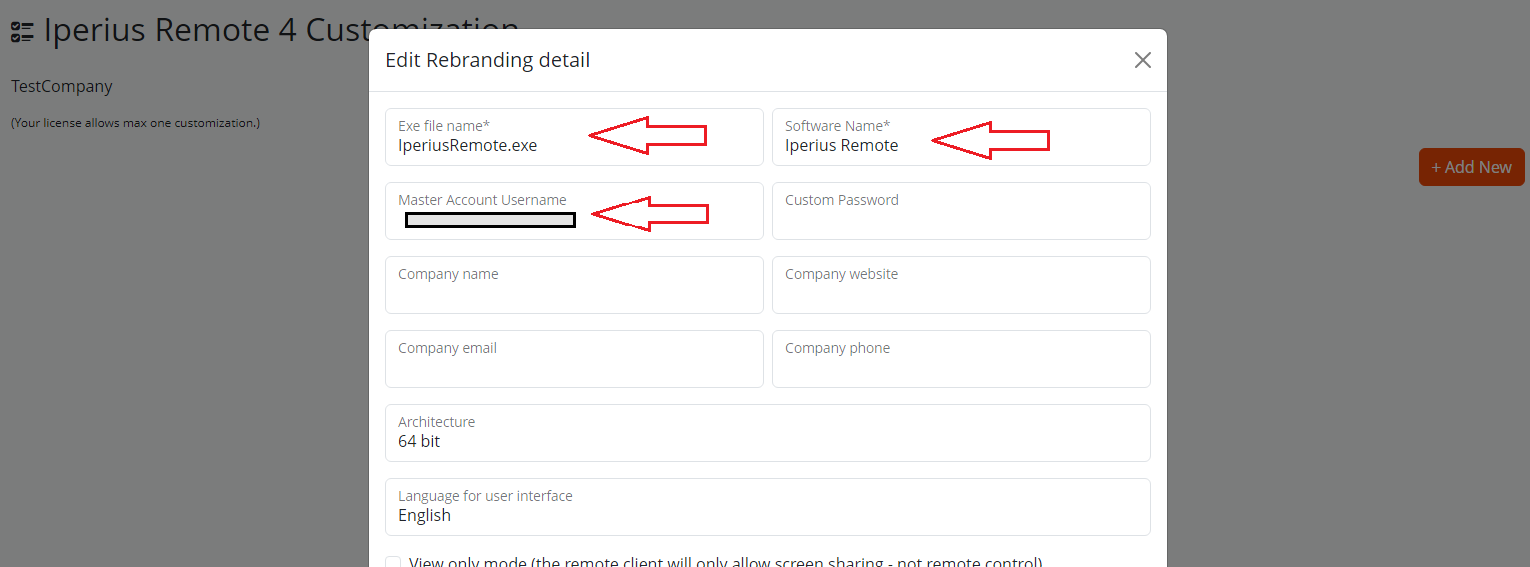
As we can see in the figure, we can immediately specify the executable file name and the software name (which will appear, for example, in the title bar of the main window).
The Master account is already specified and is not editable. Therefore, as soon as a remote computer connects in reception, we can immediately see it in our address book.
Iperius is the only remote support software that allows you the full rebranding, meaning the ability to also change the software name and icon. The ultimate adherence to your company’s brand.
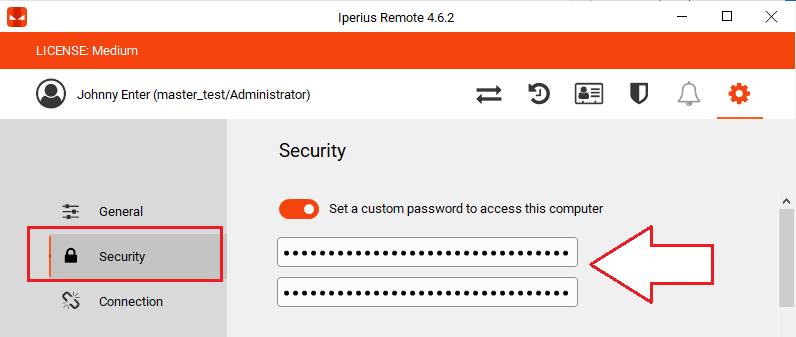
In the next field, we can also set a specific password to remotely connect to computers running this customized version. This password can obviously be changed on the remote client later (in any case, Iperius Remote allows a remote computer to be added to multiple address books, a fundamental feature when multiple companies need to support the same client’s computer).
In the image below, we see where the specific password will automatically be configured in the program:
Finally, you can enter your company’s details, which will be displayed in the main program window (company name, website, email address, and phone number).
Advanced Options:
Let’s move on to the following options, scrolling down the page:
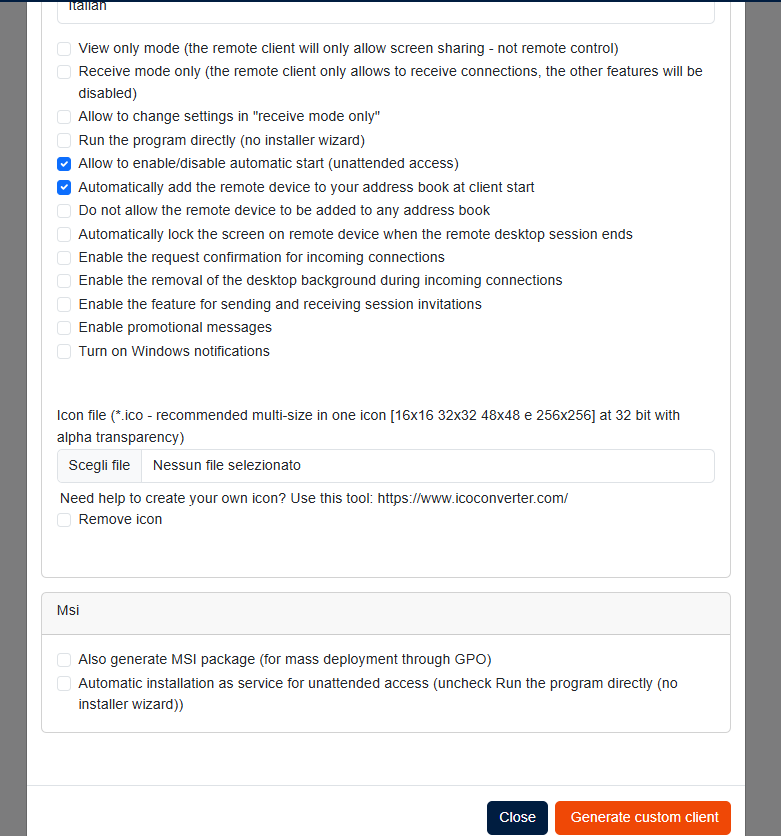
The available options are as follows:
Architecture: we can decide whether to generate the executable file in 32-bit or 64-bit
Language: you can choose the language of the executable, selecting it from the dropdown menu
View-only mode (client only for viewing): check this option if you want the remote client to have the option enabled to prevent remote control (thus allowing only screen sharing and preventing the use of mouse, keyboard, and file transfer).
Receive mode only (client only for reception): this option, selected by default, ensures that the custom client shows only a part of the interface, namely that for receiving remote connections. It will not be possible to use the custom client to connect remotely to another computer.
Allow to change settings in “receive mode only” (allow changing general settings): enabling this option, when the software is configured to work only in reception mode, it will still be possible to access the general settings of the program.
Run the program directly (no installer wizard) (run the software immediately, without showing the installation procedure): by checking this option, the custom client will start directly when the user double-clicks it. The usual window that asks whether to run or install the software will not appear.
Allow to enable/disable autostart (unattended access): by checking this option, the user on the remote computer can enable or disable the program’s automatic startup, i.e., the ability to activate or deactivate the unattended mode.
Do not add the remote device to your address book: by checking this option, the remote computer will not be automatically added to your Address Book
Do not allow the remote device to be added to any address book: by checking this option, the remote computer does not allow anyone connecting to be added to any Address Book
Allow the option to lock the screen at the end of the session: by checking this option, screen locking will be enabled at the end of the remote session on the remote computer
Icon file: we can select an icon on our computer to be used by the software in windows and as the executable file icon. It must be an .ico file containing sizes 16, 32, 48, and 256 pixels. Iperius is the only remote desktop software that allows you to customize even the icon.
Also generate MSI package (for mass deployment through GPO): by checking this option, an additional setup file with a .MSI extension will be generated, necessary if you want to install Iperius massively on all the computers within a domain using Group Policies Objects (GPO). Iperius does not require .MST files. For more information, see the related guide.
Note well: to ensure that Iperius Remote starts in unattended mode, and therefore automatically, when distributed via MSI and GPO, it is necessary to specify the custom password.
Address Book:
In the image below, we see how a newly connected remote client appears in the list of computers of an operator or administrator:
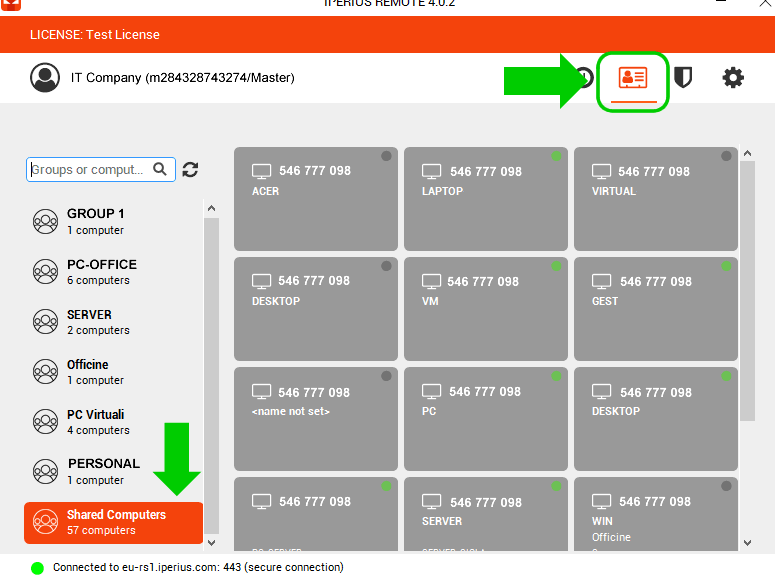
All remote computers that connect with the custom version set with the Master Account will automatically be displayed in the address book. Double-clicking on the computer’s row will start the remote desktop session.
Returning to the window for generating the custom executable file, the other important option we were talking about is the “view-only mode” (“view only mode” in English). If this option is checked, the remote clients will not give the possibility to use the mouse and keyboard. It will therefore not be possible to really take control of those machines but only to see what is happening on the screen. This mode can be useful for simple screen sharing or for presentations where we do not want those connecting to be able to interact with the remote machine and possibly make unwanted changes. When this mode is active, even file transfer will be disabled.
Generate and download the custom client:
Once we have set all the options as desired, we can finally click on the button to generate the custom executable (“Generate custom exe file“) and wait. The process should take about a minute, during which you should not exit the page. The following waiting message will be displayed:

Once the executable file has been created, it will be immediately possible to download it by clicking the relevant link :

We can then make this file available for download on our company’s website, to immediately provide our customers with a perfect remote support service.
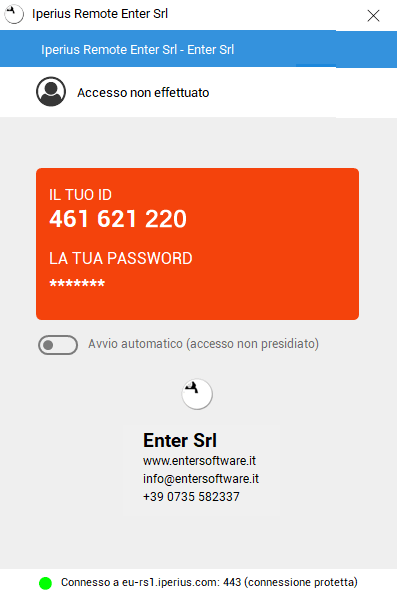
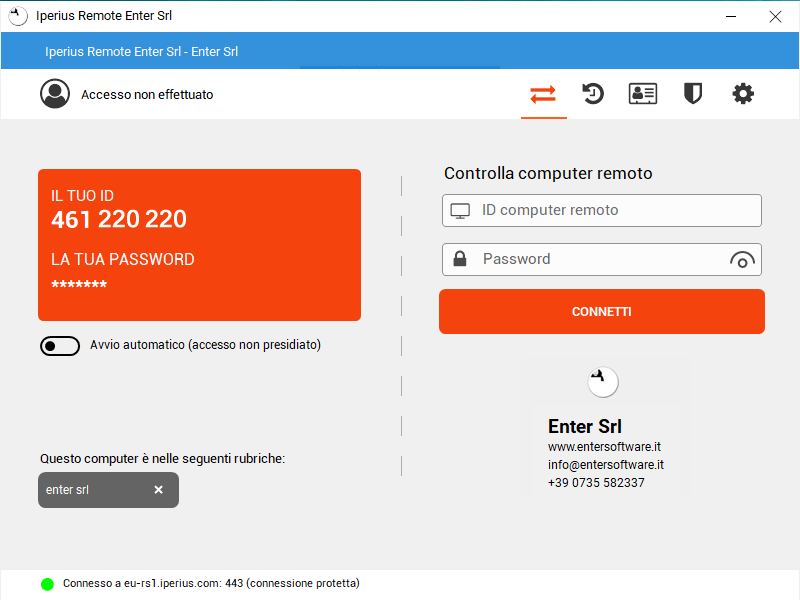
Here’s an example of a custom remote client:
In receive-only mode:
In full mode:
For any questions or doubts regarding this tutorial,
Contact us